Synopsis:
We will look at how to configure an L2TP over IPSEC VPN using OpenSWAN and how to connect to it using Mac OSX. This guide is written for running the VPN software on a CentOS 7 x86_64 EC2 instance (ami-6d1c2007) provided by Amazon Web Services. The VPN will be configured to use local authentication and a pre-shared key. This is a great way to allow access into your AWS VPC.
Procedure:
The procedure is broken into 3 parts:
- AWS – Create an EC2 instance
- VPN – Configure the server
- Client – Configure an OSX VPN client
AWS Configuration:
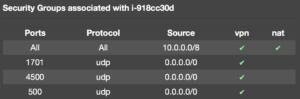
Create a new EC2 instance with an image of ami-6d1c2007 or similar. Assign it a public Elastic IP and create a security group with the following settings to allow the VPN protocols.
If you were to deploy the EC2 instance via Terraform, the configuration would like similar to the example below.
 resource "aws_security_group" "nat" {
 name = "nat"
 description = "Allow services from the private subnet through NAT"

 ingress {
 from_port = 0
 to_port = 0
 protocol = "-1"
 cidr_blocks = ["10.0.0.0/8"]
 }

 ingress {
 from_port = 0
 to_port = 65535
 protocol = "tcp"
 cidr_blocks = ["${aws_subnet.us-east-1b-private.cidr_block}"]
 }

 egress {
 from_port = 0
 to_port = 0
 protocol = "-1"
 cidr_blocks = ["0.0.0.0/0"]
 }

 vpc_id = "${aws_vpc.default.id}"
 }

 resource "aws_security_group" "vpn" {

 name = "vpn"
 description = "Allow SSH, IPSec and L2TP traffic"

 ingress {
 from_port = 0
 to_port = 0
 protocol = "-1"
 cidr_blocks = ["10.0.0.0/8"]
 }
 ingress {
 from_port = 1701
 to_port = 1701
 protocol = "udp"
 cidr_blocks = ["0.0.0.0/0"]
 }

 ingress {
 from_port = 500
 o_port = 500
 protocol = "udp"
 cidr_blocks = ["0.0.0.0/0"]
 }

 ingress {
 from_port = 4500
 to_port = 4500
 protocol = "udp"
 cidr_blocks = ["0.0.0.0/0"]
 }

 egress {
 from_port = 0
 to_port = 0
 protocol = "-1"
 cidr_blocks = ["0.0.0.0/0"]
 }

 vpc_id = "${aws_vpc.default.id}"
 }

 resource "aws_instance" "nat" {
 ami = "ami-6d1c2007"
 availability_zone = "us-east-1b"
 instance_type = "t2.small"
 key_name = "${var.aws_key_name}"
 security_groups = ["${aws_security_group.nat.id}", "${aws_security_group.vpn.id}"]
 subnet_id = "${aws_subnet.us-east-1b-public.id}"
 associate_public_ip_address = true
 private_ip = "10.0.0.5"
 source_dest_check = false
 }

 resource "aws_eip" "nat" {
 instance = "${aws_instance.nat.id}"
 vpc = true
 }
VPN Configuration:
We need to configure the following pieces of software to provide a working VPN service.
- RNGD – Random Number Generator Daemon
- OpenSWAN – IPSEC implementation for VPNs
- XL2TPD – L2TP implementation
RNG
First, we will install the random number generator service (RNG) which OpenSWAN can take advantage of to create strong random numbers.
yum install rng-tools
There’s not always a hardware generator available in virtual machines so to avoid potential errors, the contents of /etc/sysconfig/rngd should contain the following:
EXTRAOPTIONS="--no-tpm=1 --quiet -r /dev/urandom"
Now, start the RNG service
systemctl start rngd
OpenSWAN
Install the OpenSwan package:
yum install openswan
Now that OpenSWAN is installed we can add the IPSEC configuration to /etc/ipsec.conf. Replace the values of leftid and leftsourceip with the private IP address of the EC2 instance.
 version 2.0

 config setup
     dumpdir=/var/run/pluto/
     plutostderrlog=/var/log/pluto.log
     nat_traversal=yes
     virtual_private=%v4:192.168.0.0/24,%v4:172.16.0.0/12
     oe=off
     protostack=netkey
     nhelpers=0
     interfaces=%defaultroute

 conn L2TP-PSK
     auto=add
     left=%defaultroute
     leftid=10.0.0.5
     leftsourceip=10.0.0.5
     leftnexthop=%defaultroute
     leftprotoport=17/%any
     rightprotoport=17/%any
     right=%any
     rightsubnet=vhost:%no,%priv
     forceencaps=yes
     authby=secret
     pfs=no
     type=transport
     auth=esp
     dpddelay=30
     dpdtimeout=120
     dpdaction=clear
Now, we need to add an IPSEC secrets file. The file should contain both the public IP and private IP address of the EC2 instance. Replace the IP address values below as well as the pre-shared key with something much stronger. The key will be used by the clients to authenticate to the server.
 10.0.0.5 %any : PSK "blah"
 1.2.3.4 %any : PSK "blah"
The IPSEC service will not pass validation unless we disable reverse path filtering, the sending of ICMP redirects, and the reception of ICMP redirects in the kernel for all interfaces.
 for interface in all default eth0 lo; do
     sysctl -w net.ipv4.conf.${interface}.send_redirects=0
     sysctl -w net.ipv4.conf.${interface}.accept_redirects=0
     sysctl -w net.ipv4.conf.${interface}.rp_filter=0
 done
Next, we must allow IP forwarding in the kernel.
sysctl -w net.ipv4.ip_forward=1
After, we must enable Proxy ARP for all interfaces.
 for interface in all default eth0 lo; do
     sysctl -w net.ipv4.conf.${interface}.proxy_arp=1
 done
At this time we can start the IPSEC service and verify its configuration.
 systemctl start ipsec
 ipsec verify
If everything looks good move to the L2TP configuration otherwise troubleshoot by checking the following resources:
 ipsec verify
 ipsec status --all
 cat /var/log/secure
 cat /var/log/pluto.log
XL2TPD
Install the L2TP server implementation.
yum install xl2tpd
Configuring the L2TP daemon is easy. Copy the contents to /etc/xl2tpd/xl2tpd.conf and change the value of local ip to the EC2 instance’s private IP address. In addition, you may want to adjust the value of ip range which is the address range handed out to VPN clients. The range should be available addresses within the VPC network.
 [global]
 port = 1701

 [lns default]
 ip range = 10.0.0.241-10.0.0.254
 local ip = 10.0.0.5
 require chap = no
 unix authentication = yes
 refuse pap = no
 require authentication = yes
 name = l2tpd
 ppp debug = yes
 pppoptfile = /etc/ppp/options.xl2tpd
 length bit = yes
Now, we need to tell the PPP server to use xl2tpd options. To do this, add the following contents to /etc/ppp/options.xl2tpd. Any DNS server addresses will do for the ms-dns values.
 ipcp-accept-local
 ipcp-accept-remote
 ms-dns 8.8.8.8
 ms-dns 8.8.4.4
 noccp
 auth
 crtscts
 idle 1800
 mtu 1280
 mru 1280
 lock
 connect-delay 5000
 name l2tpd
 proxyarp
 login
 logfile /var/log/xl2tpd.log
Next, we will configure the PPP service to use local authentication for users. This means that their user accounts on the VPN server along with the pre-shared key will be used for authentication. Anytime you want to allow a new user to access the VPN you only need to create a new Linux account for them on the server.
Add the following contents to /etc/ppp/pap-secrets:
 # Secrets for authentication on server using CHAP
 # client server secret IP addresses
 * l2tpd "" *
After that we need to configure PAM to allow local authentication by editing the file /etc/pam.d/ppp to only contain:
 #%PAM-1.0
 auth required pam_nologin.so
 auth required pam_unix.so
 account required pam_unix.so
 session required pam_unix.so
Finally, we can start the L2TP service.
systemctl start xl2tpd
If you encounter any issues check the following log files:
 cat /var/log/xl2tpd.log
 cat /var/log/messages
Client Configuration:
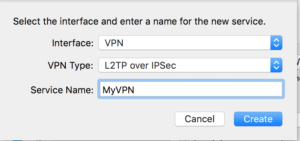
We will use OSX’s builtin VPN client to connect to the VPN. Begin by selecting System Preferences and then Network. Next, choose the “+” on the bottom left to add a new network interface.

Choose VPN as the interface and select L2TP over IPSEC.
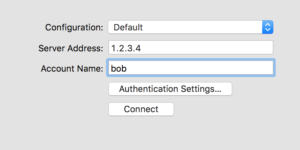
Add the server’s public IP address, a username on the VPN server, and click on Authentication Settings.
For Password, add the user’s server account password and then add the pre-shared key value for Shared Secret.
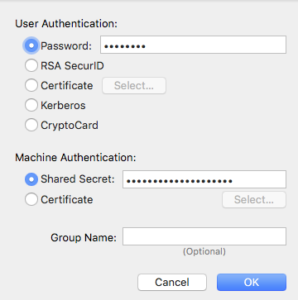
Apply, and then connect.