I recently packaged up the new Nexpose release so that Backtrack users can have an up-to-date version of Nexpose, straight from the Backtrack repos. This seemed like a great time to also go over installing Nexpose Community and integrating it with the already-installed Metasploit Community.
1. Getting Started
Before we get started, I would recommend grabbing a copy of Backtrack 5 R2 64-bit. The machine you want to use will need to have at a minimum 2GB of RAM and at least 5GB space on the hard drive. It is recommended you have at least 8GB of RAM, however. I also would not suggest performing these actions with Backtrack running as a Live CD. Please install to your hard drive, or use a virtual machine.
Installing Backtrack is beyond the scope of this post. Once you have Backtrack installed, let's get Metasploit updated to the latest release. To start the Metasploit Community UI, run the following command:
/opt/metasploit/ctlscript.sh start
It may take a minute or two, depending on the speed of your computer, but once Metasploit Community has been started, you will be able to access it via Firefox. Once you are navigated to the initial Metasploit Community page, you will need to disable the javascript blockers Backtrack has installed by default. You will see a small popup in the bottom right hand corner that allows you to do this easily. Click on "Options..." and click "Allow 127.0.0.1" in the popup menu.

Once you have javascript blocking disabled, you will need to set up your Metasploit Community user and register for a Metasploit Community key.
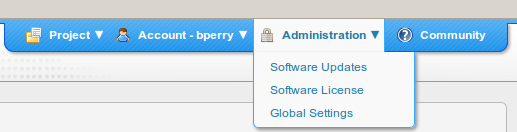
After creating your user and registering, you will navigate to the main Metasploit Community dashboard. In the top-right corner, you will want to hover over the Administration menu and select Software Updates.
Metasploit was recently updated to 4.2.0, and this will update you to this newer version. Once updated and restarted, Metasploit Community will display a button to direct you back to the dashboard.
Now, let's get Nexpose installed. The debian package was recently updated and the installation process is a bit different than in the past. Be sure no other Nexpose instances are installed on the system. Please remove them before installing from the repos.
First, be sure to refresh your Backtrack repos with:
apt-get update
Otherwise, you may still get the older package. When you are ready, type the following:
apt-get install nexpose
You will also be required to install libstdc 5.
When you have downloaded the package, you will be asked a few questions before the installation process can continue:
-------------------------------------------------------------------------------- ----------------------------------------------------
[...]
Setting up nexpose (5.2) ...
What is your first name?
Brandon
What is your last name?
Perry
What company are you installing this for?
Rapid7
What do you want your username to be?
xxx
What do you want your password to be?
xxx
Verify password:
xxx
Unpacking JRE ...
Starting Installer ...
The installation directory has been set to /opt/rapid7/nexpose.
Extracting files...
Finishing installation...
Removing Nexpose from startup....
Please run:
cd /opt/rapid7/nexpose/nsc/ && sh ./nsc.sh
to start Nexpose for the first time. This initial startup may take several minutes depending on your hardware setup.
-------------------------------------------------------------------------------- -------------------------------------------------------------------------------- ---------------------------------
Once installed, you will still need to start Nexpose for the first time. This first-time startup may take a few minutes depending on your hardware setup. When it starts up, it will set up its databases and caches. You will not need to run this command again, and later start-ups will be much faster. The Backtrack devs have strict rules on applications starting up that listen on network interfaces, so Nexpose will not start automatically on later reboots. To start Nexpose after this initial start-up again, you may run the following command:
/etc/init.d/nexposeconsole.rc start
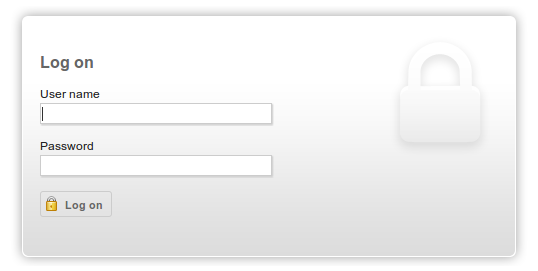
When the initial setup and start-up are finished. You will be presented with a login screen asking for the credentials that you passed to the installer.
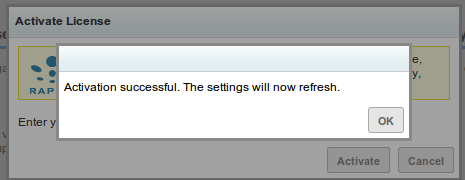
Once logged in, you will be asked for a license key. Simply follow the registration link, register for a key, and enter it in the textbox.
2. Configuring Metasploit and Nexpose to communicate with each other
Now, we are ready to get down to business. First things first, create a new Project in Metasploit, then from the dashboard, click on the Project to go to the project's dashboard. We will need to add a Nexpose console so that Metasploit can communicate with and control Nexpose. From the project dashboard, click on the "Nexpose..." button to start:
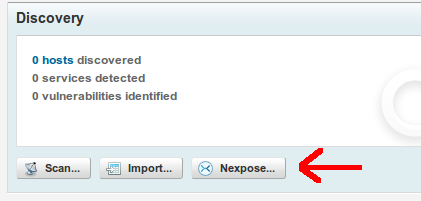
You will be presented with a page that tells you no Nexpose engines have been configured, with a link. Click this link to create a new Nexpose engine:
Now, enter your Nexpose information and credentials:
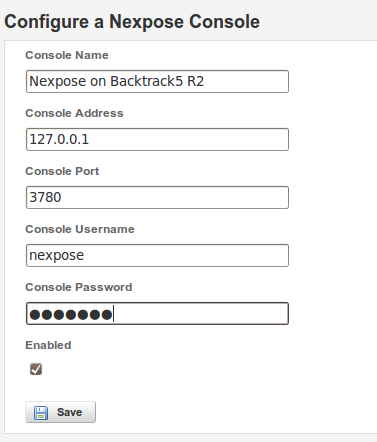
Once saved, you will be able to kick off scans to Nexpose from the Metasploit Community interface.
3. Kicking off scans
From the project dashboard, click on the "Nexpose..." button again and you will see your Nexpose engine available in the drop down list. Insert the list of IP address you want to scan. Note: Nexpose Community only allows up to 32 IP addresses to be scanned. If you pass it a /24, you will not get the desired results. I find it easiest to do a quick nmap of the subnet I want to scan, and get the hard IPs of the machines on the network. Something along the lines of "nmap 192.168.1.0/24 | grep ^Nmap".
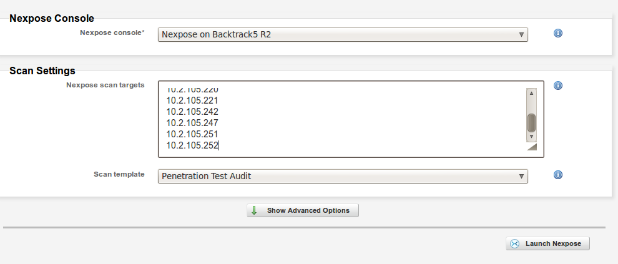
Once done, you may kick the scan off by clicking "Launch Nexpose". You will be taken to a page that will watch the scan until done and import the results automatically into Metasploit Community.
4. Exploitation
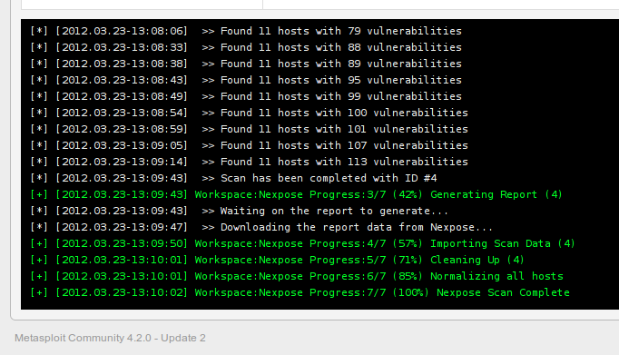
Metasploit will now correlate the data and give you a good idea of just how exploitable each asset is that you have scanned and imported. When you go back to your project's dashboard, you will notice that Metasploit is now reporting to have X number of hosts with Y vulnerabilities.
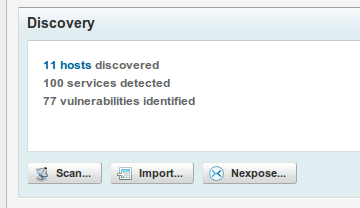
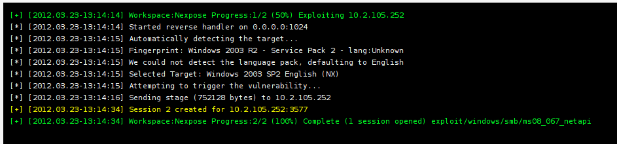
Clicking on the hosts link will take you to the details page of that project. You will be able to dig down into the data, see just what vulnerabilities each asset has, and, if possible, exploit them with a click of your mouse. For example, one machine I scanned was vulnerable to the classic MS08-067.

Metasploit Community will list any exploits it has to the right of the vulnerability in the UI. Clicking on the exploit it has will give you a page that allows you to configure how the exploit will be sent and what payloads it will use. Ultimately, you click "Exploit", and Metasploit Community will exploit the vulnerability and gain a remote shell.
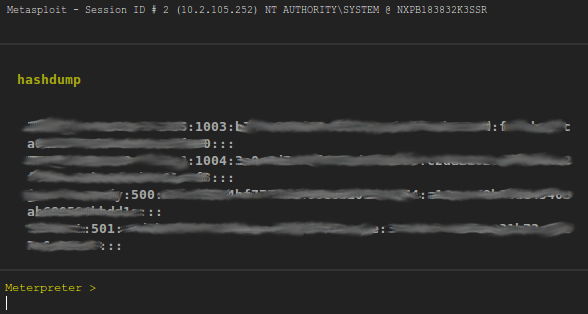
Once you have gotten a shell on the remote machine, you may interact with the session from the UI by clicking on the Sessions tab in the project. Clicking on the session we just opened, you are taken to a page that interfaces with the session. You may run post modules such as hashdump straight from the UI:
This post covers only a portion of the integration Metasploit has with NeXpose. Separately, the two are very powerful tools. But combined, you are able to optimize your workflow and go from asset discovery, to vulnerability assessment, to exploitation in a matter of minutes. I would like to give a shout out to Devon Kearns of the Backtrack team for working with me and getting my packages into the Backtrack repos like a boss.
Also, if you are a red team member for a CCDC competition, hit us up for a license key for Metasploit Pro and Nexpose Enterprise to use during red teaming. You can follow the same workflow as described in this blog post to expedite your discovery and exploitation, with the added benefits of the automation that both Metasploit Pro and Nexpose Enterprise offer. Tweet to @rapid7 with your info and we will get back with you.