The following is a guest post from Rapid7 customer Bo Weaver.
Hi, everyone. I’m Bo, a penetration tester at CompliancePoint (and also a customer of Rapid7). If you’re just getting started in penetration testing, or are simply interested in the basics, this blog is for you.
An Intro to Kali
Kali Linux is an open source project that is maintained and funded by Offensive Security, a provider of information security training and penetration testing services. Kali has become a go-to distribution for hacking, and rightly so. In less than an hour, you can have a running pen testing box with more tools than you will ever use. There is nothing wrong with having a “full toolbox,” but sometimes loading individual tools on the distro of your choice can be a hair-pulling experience. With Kali, the developers have already installed key tools for you, so your experience is pain-free. I run Kali on all my laptops—in fact, this post is being written on Kali under a normal user account on my “sittin’ in the coffee shop” laptop.
Different Options for Running Kali
You can often install Kali fully on your machine.
In other cases, the workstation you are provisioned for a pen testing job may require you to keep Windows as the primary operating system. In this case, you could install a virtualization tool (I recommend the free, Virtualbox solution) and run Kali in a virtual machine. However, the lack of memory on your Windows machine might cause it to crash frequently, and you may encounter restrictive policies such as the USB ports being disabled.
And finally, Kali’s site has instructions for installing to a USB drive with persistence to keep any saved data. This is a good approach, with one major problem; the method detailed by the instructions does not encrypt the USB drive. This lack of encryption is fine when playing with Kali against lab machines; but you wouldn’t want to keep real testing data on a non-encrypted drive, so this method isn’t safe. (Note: This is still a great way to learn Kali and have it running directly on your hardware without messing with your onboard OS. Still, it won’t work for "real" work.)
The Best Approach?
Install and run Kali from an encrypted external USB drive.
So how do you secure your data and also make sure you can prove indisputably that data cannot be transferred from the onboard drive of your personal laptop to the working USB drive that Kali is running on? Here’s a quick checklist for you to follow:
- Use a USB drive owned by the company.
- Perform a full install of Kali to a 1TB USB drive using full disk encryption on the drive.
- Encrypt your data on the USB drive. Since the onboard drive is also encrypted—using different encryption—the onboard drive cannot be accessed when booted to the operating system working from the USB.
- Since the USB drive is owned by the company, all data is being used and stored on company hardware. So per the security policy, all company and customer data is on company hardware.
- When the project is over, you hand over the USB drive and all testing data goes back to the client.
Before we go any further, I want to say use these tools only on systems that you have written authorization to test or systems that you personally own. Any use of these tools on a machine you do not have authorization to test is illegal. I don’t want any jailbirds on my watch.
So… Let’s Get Started
Here’s a closer look at how you can implement this approach. In this example, I used a 1TB USB3 drive for the project and the speed difference wasn’t that different from the onboard drive. This method also works with flash cards.
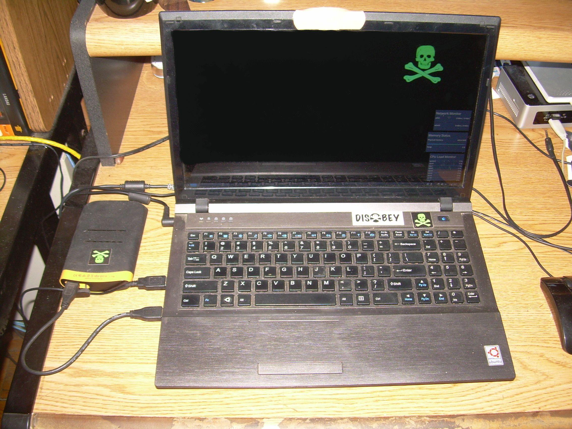
Laptop Running Kali From a 1TB USB Drive
To get started download a Kali Linux ISO and burn the ISO to DVD or Image Kali Linux Live to USB. Insert your external drive that you are going to install Kali on to (such as my 1TB USB3 drive) into a machine, along with the installation media you just created. Be sure a plug the external drive in BEFORE booting the system.
Follow the Kali Linux Hard Disk Install steps from the official docs up to step #9 where the installer screen reads “Partition disks” — These first 9 steps will take you through booting to you installation media and preparing to install to your external drive.
Drive Setup
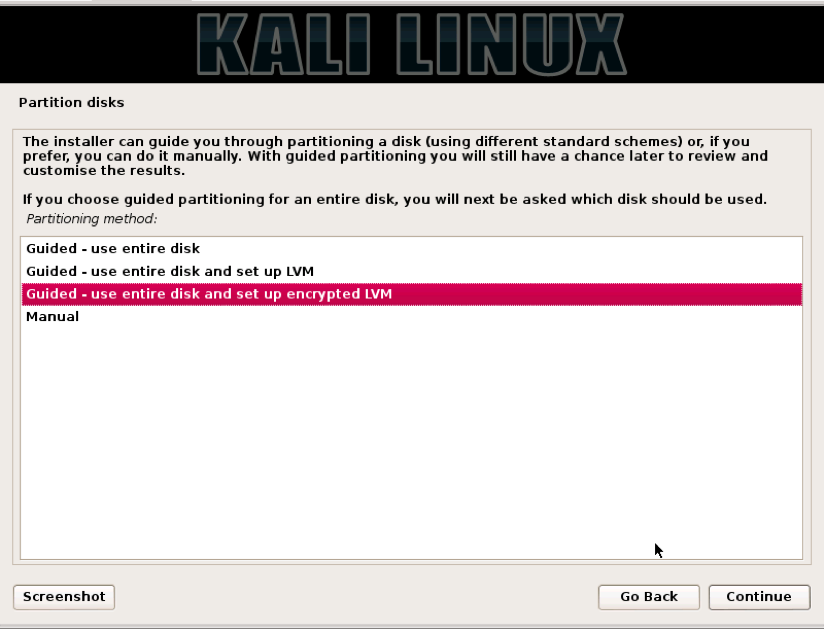
The next step will be setting up the drive, encrypting it, and partitioning the drive. The next dialog will ask you to select the type of partitioning for this install. Pick Guided – Use entire disk and set up encrypted LVM. This will fully-encrypt the entire drive, as opposed to just encrypting the /home directory. Remember, when pen testing, the tools store data in more than just the home directory, and log files contain all types of goodies.
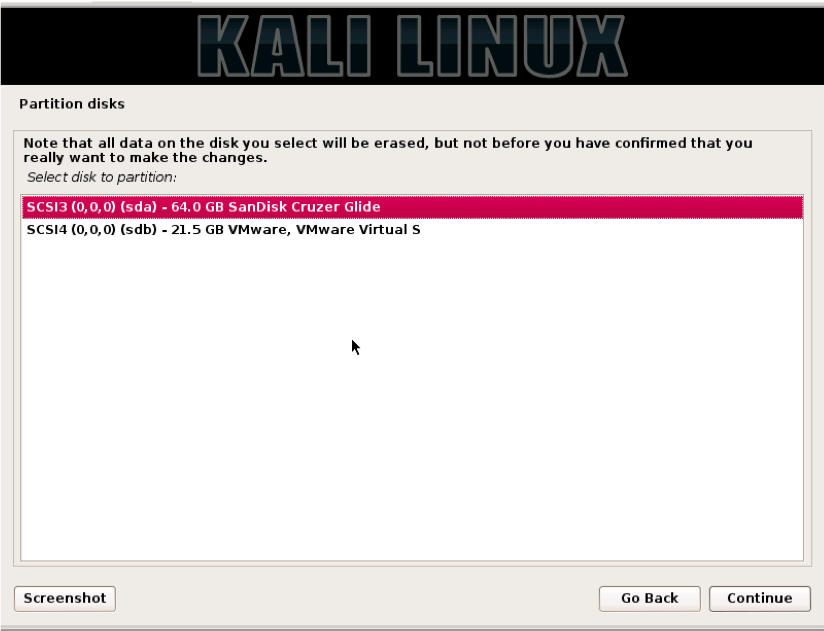
In the next window, you will be asked to pick the disk to install on. WARNING! Be careful to pick the USB disk and not your local drive. If you pick your local drive you will wipe the operating system from that drive. Note in the window below you can see the USB drive and a VMware virtual disk. The virtual disk is the hard drive of the virtual machine being used for this demonstration. Select the USB disk and click “Continue.”
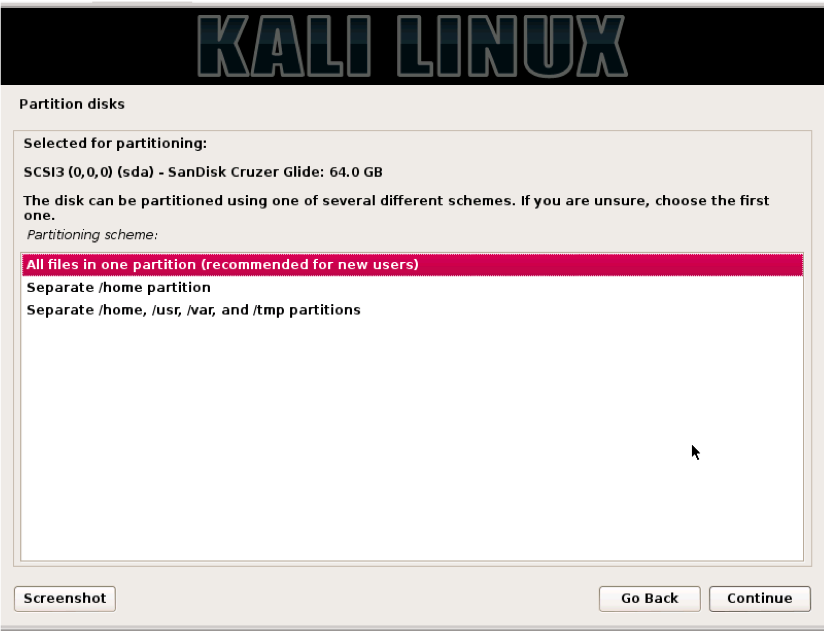
Next, you will be asked how to partition the drive. Use the default, which is to put everything on one partition, and click “Continue.”
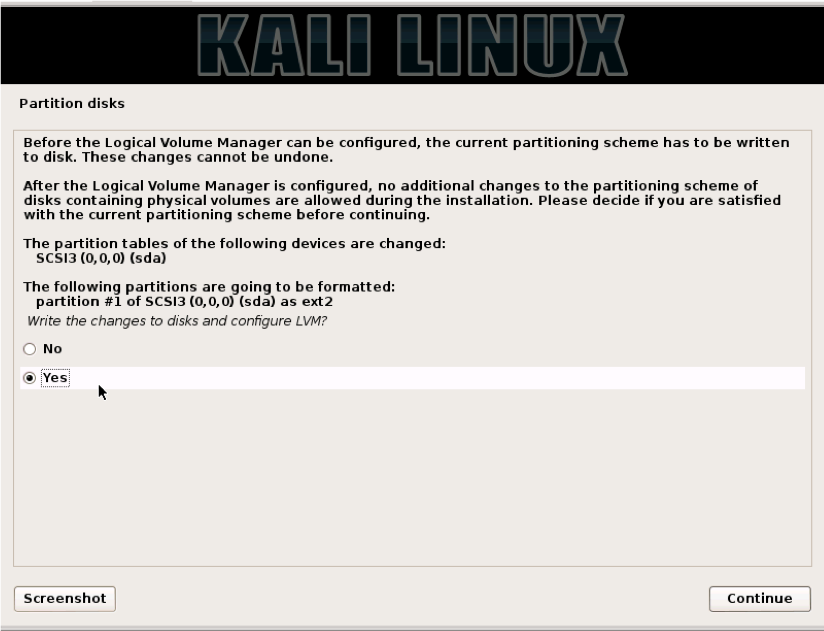
You will then be asked to save the partitioning information, which will start the partitioning process. When you click “Continue,” all data will be lost on the USB drive you are installing to. Click “Yes” and then “Continue.”
This will start the disk encryption and partitioning process. First, the drive is fully erased and encrypted. This will take a while. Get a cup of coffee, or better yet, go for a walk outside. A 1TB drive will take about 10 hours for the encrypting process. A 64GB drive takes about 30 minutes.

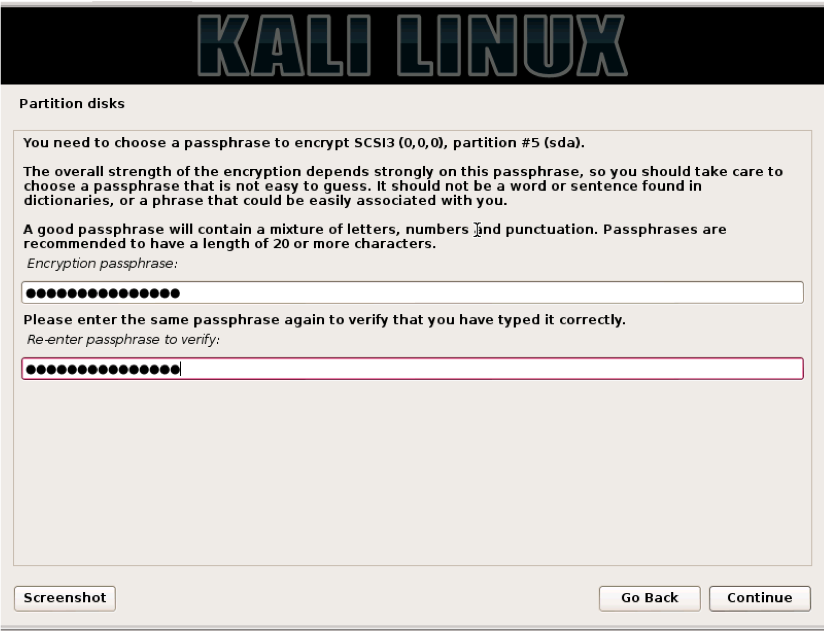
Once the encryption is complete, you will be asked to give the drive encryption a passphrase. You will use this passphrase when booting up Kali. Note the term “passphrase.” Use something really long but easy to remember. A line from a song or a poem or quote. The longer the better. “Mary had a little lamb and walked it to town.” Even with no numbers in this phrase it would take John the Ripper forever to crack this. I know I tried.
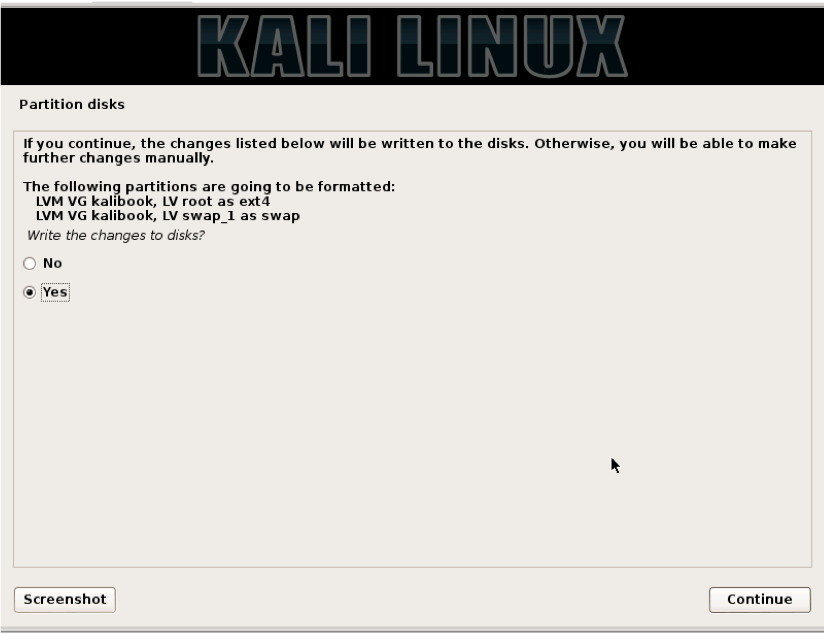
Next, you will be ask to confirm these changes. Pick “Finish partitioning and write changes to disk” and click “Continue.”

Next, click the “Yes” radio button and click “Continue”.
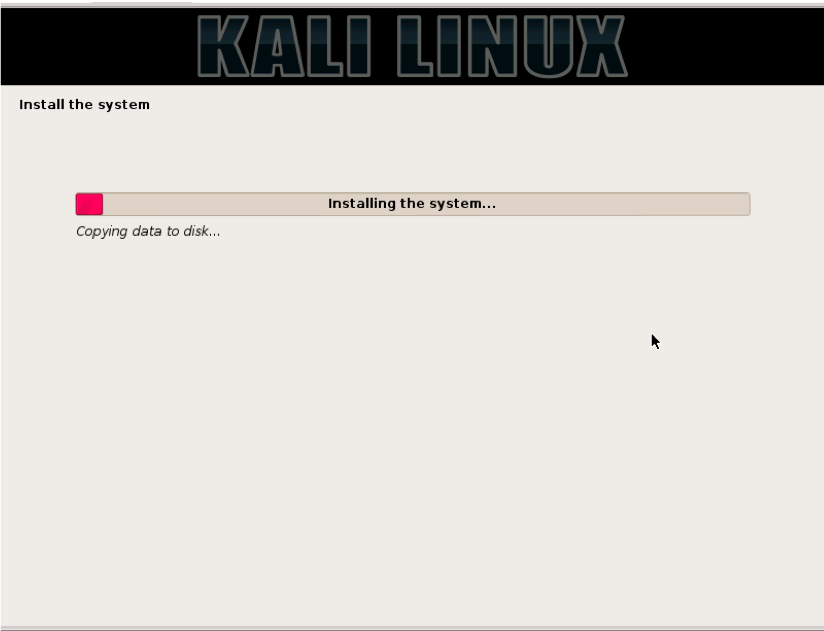
Now the system will start the partitioning process.

After the partitioning process, the system install will start.
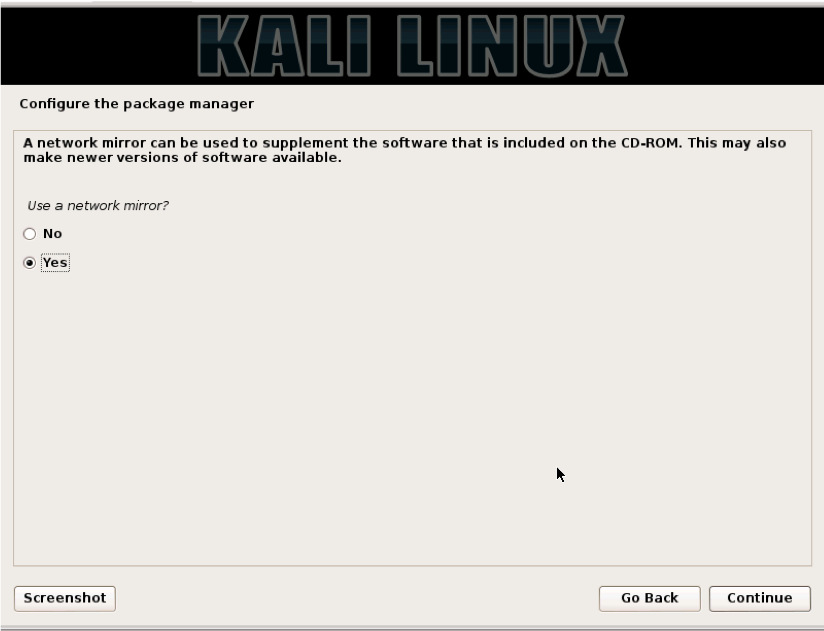
You will then be asked if you want to use a “Network Mirror.” Click “Yes” on this. This will select repo mirrors close to your location and help speed up you updates later when you update your system.
Your install process will now complete and you will be asked to reboot the system. Be sure to remove the install disk before rebooting.
Booting Your New Installation of Kali
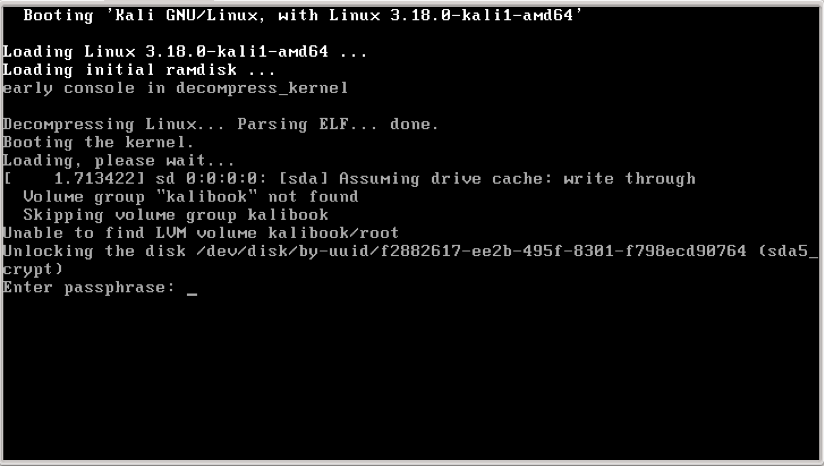
Now we're ready to fire up Kali. Insert your Kali USB drive into your machine and power it up. In the beginning of the boot process you will be given the ability to manually select a boot drive. On my laptop you press F7. This will vary depending on the type and make of your machine. By whatever process your machine uses, you will be given a menu of the available drives to boot from. Pick the USB drive and continue. When the system boots you will be presented a screen asking for your passphrase. This is the passphrase we set earlier during the install. This is not the root login password. Enter the passphrase and hit the Enter key.
This will start the actual boot process of the system from the now unencrypted drive. Once the system is booted up you will be given the login screen below.

Almost There!
Now, let's login and continue our set up.
On your first login, check to be sure that everything is up to date. All operating systems need updates and all operating systems have flaws and vulnerabilities—even Linux—so be sure to update regularly. Please also remember that the tools on this distro are dangerous in the wrong hands, so don’t get caught with your pants down by getting hacked and freely give them the tools to burn down the rest of your network.
Ready? Pull up the terminal application of your choice type the following:
root@kalibook :~# apt-get update
This will refresh the update list and check for new updates. Next, run:
root@kalibook :~# apt-get -y upgrade
This will run the upgrade process the “-y” automatically answers “yes” to the upgrade. The system will run an upgrade of all applications. Reboot if necessary.
Success! We now we have a fully encrypted drive and a full installation of Kali we can plug into any USB bootable machine. Our data is secured and in no way touching the laptop drive (meaning we can hack away until the cows come home).
I hope you enjoyed this article and that you find it helpful in your work. Happy hacking!