This is the first in a series of blog topics by penetration testers, for penetration testers, highlighting some of the advanced pentesting techniques they'll be teaching in our new Network Assault and Application Assault certifications, opening for registration this week.
So you're starting a pentest. Or you finally get to try out the hands-on part of the Network Assault class. You're probably eager to fire up Metasploit and start pwning, but before you can, you have to understand WHAT you want to/can attack. That's where the critical first step of a penetration test comes in: reconnaissance.
Reconnaissance and intelligence gathering is a crucial part of any pentester's gameplan; you can only test what's available so we have to know what's out there. A machine with no ports open and no responses isn't very useful, to a user or a pentester. You can also look for evidence that the system is already compromised by finding open back doors or other software that shouldn't be there, typically with a vulnerability scanner. However, a vulnerability scanner can also disclose false positives (when the vulnerability scanner reports a vulnerability, but the vulnerability doesn't really exist). One example could be that the scanner reports blind sql injection because it didn't get the same response it expected; when the tester tries to validate, he finds that the response was an unrelated error message.
Any vulnerability scan should be manually validated to ensure what is reported is a true positive. A good scanner makes this easy by reporting the actual test that it used, so the person doing the validating can run the proof themselves; for example, if a vulnerability scanner reports that XSS is present, it should show the parameter that was tested and the actual code it used.
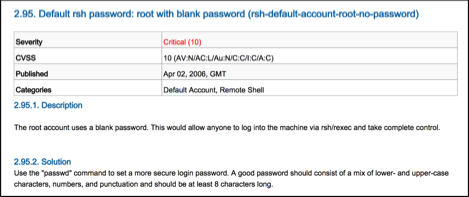
In the figure below, we see one example of the type of information that is gained from the Nexpose scanner. Nexpose is reporting that rsh is enabled on the server and the root account doesn't have a password at all! We can also see that the Nexpose vulnerability scanner is offering a solution. It gives an explanation of how to mitigate this confirmed vulnerability using the “passwd” command. Nexpose will give this kind of information, including its severity level, for each vulnerability it finds.
Once the vulnerability scan is complete, you'll have an idea of the version of the operating system, version of the web server (if there is one) and other services' versions. Additionally, you'll have a list of the potential vulnerabilities of the system. These will be a great starting point when you get to the exploitation stage, as one or more of them could get you a foothold toward gaining full control of your targeted environment.
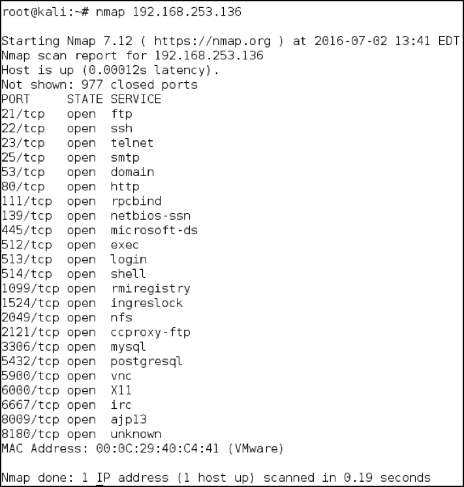
Next, a good pen tester will try some more specific scans, that can be done concurrently. One very common example is a port scan. The most commonly used tool for a port scan is nmap, which lets you easily find open ports on both TCP and UDP. A default nmap scan will test the 1000 most commonly used TCP ports, with a simple SYN check. The targeted machine will respond with the ports that are available.
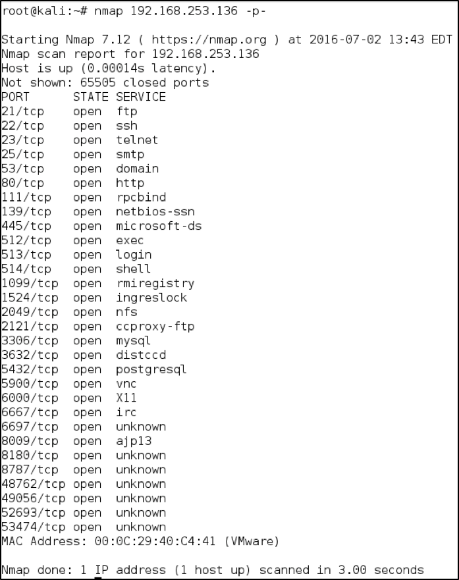
We may also want to check all 65,535 available ports on a machine, to see if it is using any uncommon or non-standard ports. This can by done by adding the “-p” flag. You can either indicate all ports with “-p 0-65535” or more simply just “-p-“.
Conveniently, we can have nmap output its results to files, which may be more easily read by other tools, in case we don't want to read each machine's results ourselves, or if there are too many to go through.
Use the –oA flag to tell nmap to output the results to all possible file types, using the string after (in this case, “scan”) as the file name. The file types that will be created are a greppable nmap file, an exact replica of the output we see above, and an xml file.

Nmap has a bunch of other functionality for more specific tasks including running additional test scripts, or even doing brute forcing, that may be used later in the assessment.
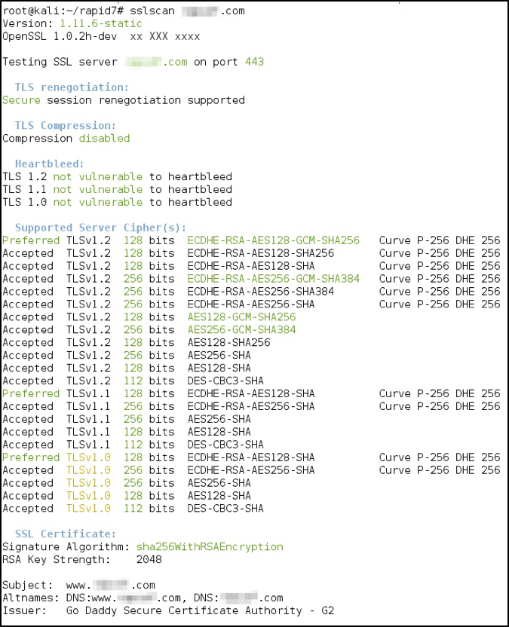
Once Nexpose and nmap have completed, it's time to get even more focused. Nexpose and nmap should have given you and idea of the underlying operating system, open ports, and services that are running. Based on that information, try using some more specific scanning tools. If there are secure HTTP ports open (443 is the standard), you could run SSLScan to get an idea of the strength of the ciphers being used and information about the SSL certificates in use.
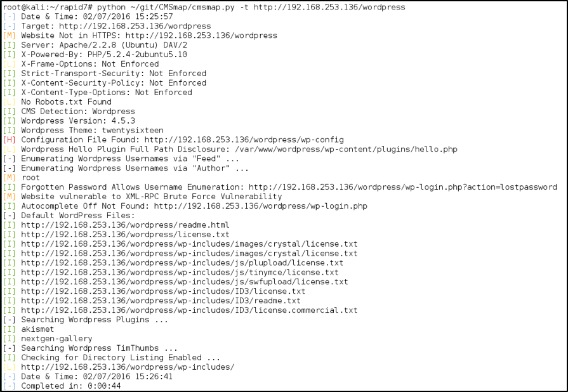
If there is a content management system (CMS) running, you might want to get a better idea of what its running with a tool like CMSmap, or WPScan (if running WordPress) or Droopescan (if running Drupal). With a little searching, you can probably find a tool for whatever CMS the site may be running. In the figure below, we are running CMSmap against a Wordpress site, to get a better idea of which themes and plugins are installed.
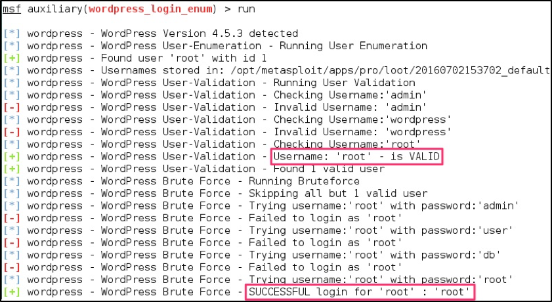
Lastly, while exploitation is out of the scope of this blog post, the Metasploit tool does have auxiliary scanning modules that can also find out even more about the target. In this example, we used the auxiliary/scanner/http/wordpress_login_enum module to brute force the username and password to the Wordpress site.
Before starting the exploitation stage, you'll always want to get as much information about what's running and which versions. Knowing these bits will make the exploitation stage faster, easier and safer, and make the Network Assault class even more enjoyable. Good luck!