This blog was co-authored by Nils Kresl and Teresa Copple.
“Quis custodiet ipsos custodes?” or, “Who watches the watchmen?” This question was first famously asked by the Roman poet Juvenal almost 2,000 years ago, and we are still concerned about it today. How are you monitoring the activity of your “watchers”—that is, your IT teams, security teams, and software?
In this blog, we will discuss one common method of accomplishing this, by collecting the audit trail from a device or application. Specifically, we will examine collecting the audit trail from InsightVM with InsightIDR, as this same method can be used to collect the audit logs from many different applications.
In the Rapid7® InsightVM/Nexpose 6.5.77 release, which came out in August 2019, we added a new audit.log file to keep track of all user creation, deletion, role change, and site configuration change events on the Security Console. The audit.log is located along with the other diagnostic log files in
[installation_directory]/nsc/logs directory on the Security Console. For Windows, this is typically C:\Program Files\rapid7\nexpose\nsc\logs and for Linux, the default location is /opt/rapid7/nexpose/nsc/logs.
Let’s see how we can collect the audit log entries and send it to InsightIDR, our cloud-based SIEM tool, for monitoring purposes. This allows the log to be stored in a central place and also lets you configure custom alerts or dashboards to monitor user account and site changes.
To monitor the audit.log events, the log can be collected as an event source in InsightDR. There are different ways to collect the audit logs and send them to the InsightIDR collector, such as syslogd or rsyslog. However, we are going to use the free tool NXLog Community Edition, since it will allow us to send the logs using encrypted syslog and we find it easier to use than rsyslog. While NXLog CE can be used on Windows or Linux, we are going to use it with an InsightVM Console running on Ubuntu 18.04.
Add a Custom Log Event Source in InsightIDR
First, we need to add an event source in InsightIDR for the audit.log.
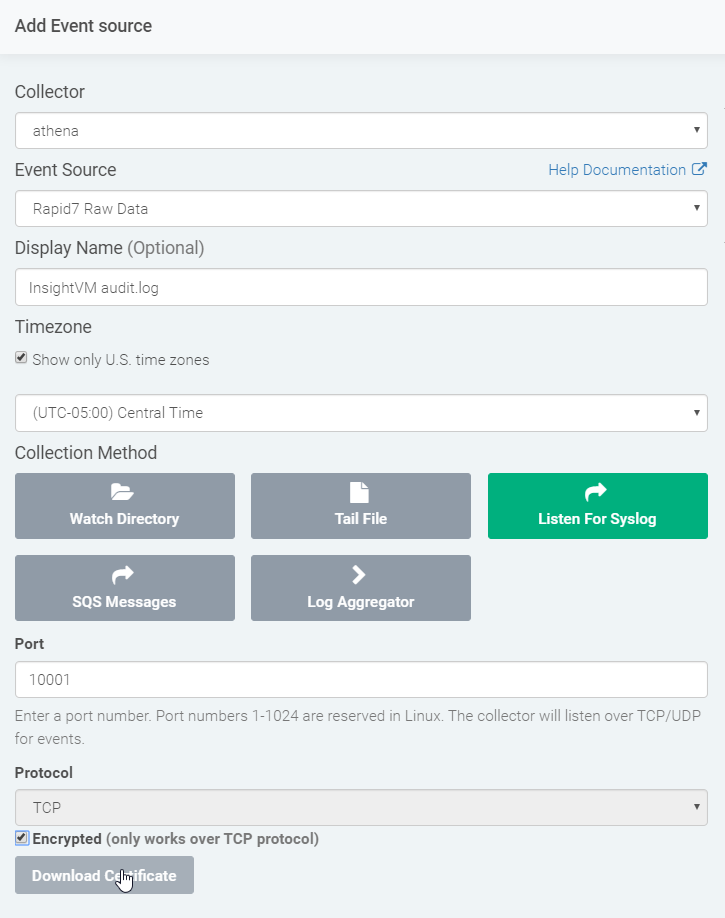
Following the instructions here, log in to InsightIDR with an account that has been assigned the Admin role. Navigate to Data Collection -> Set Up Event Source -> Add Event Source. Use the event source type Custom Log for this new event source. For Collection Method, use syslog, then configure the event source to use the same port that you will specify with NXLog. Check the Encrypted box and download your InsightIDR certificate.
Install nxlog on the Console
Windows
If your InsightVM Console is running on Windows, follow the instructions here to download and install NXLog. Continue with the steps below to copy the provided nxlog.conf file over to the Console.
Linux
If you host your own Console, SSH into it and perform the following steps. However, if you are a Managed Service customer, you will need to reach out to your Customer Advisor to have that person perform the following steps for you.
The general steps for installing NXLog on Ubuntu can be found in the NXLog User Guide. The commands that we used are listed in detail below.
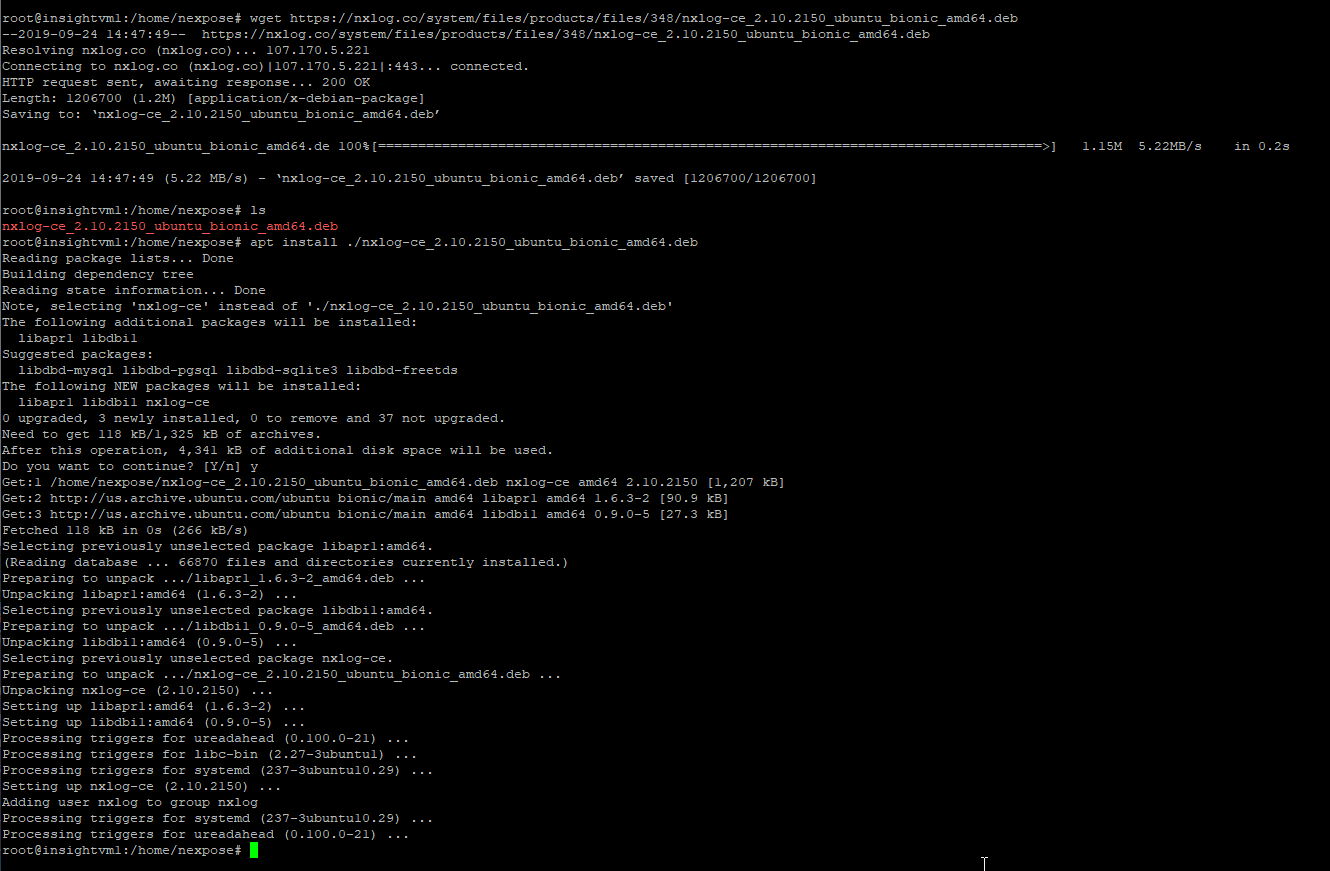
NXLog is not available in the default Ubuntu repositories, so we first need to download the package to the InsightVM Console. You can head over the NXLog downloads page or run this command to get the package.
wget https://nxlog.co/system/files/products/files/348/nxlog-ce_2.10.2150_ubuntu_bionic_amd64.deb
After you have downloaded the binary, you need to install it.
sudo apt install ./nxlog-ce_2.10.2150_ubuntu_bionic_amd64.deb
Once nxlog has been installed, you will need to go into the nxlog.conf file and edit it to match your environment. The default location for the nxlog.conf file is:
- Linux: /etc/nxlog/nxlog.conf
- Windows: C:\Program Files (x86)\nxlog\conf
NXLog is controlled with its configuration file, the nxlog.conf. You edit the conf file to specify to the NXLog service what you want it to do. After configuring the nxlog.conf, you start the NXLog service.
Start by renaming the original nxlog.conf:
mv /etc/nxlog/nxlog.conf /etc/nxlog/nxlog.conf.original
Copy the provided nxlog.conf to your InsightVM Console and place it in the /etc/nxlog directory.
The nxlog.conf file begins with a section of global directives to specify where nxlog will create its own diagnostic log and where the Rapid7 certificate that you downloaded earlier needs to be located.
User nxlog
Group nxlog

#Set the NXLog main directory

define ROOT /etc/nxlog
#Global directives
Moduledir /usr/lib/nxlog/modules
CacheDir %ROOT%/cache_dir
SpoolDIR %ROOT%/spool_dir
Pidfile /tmp/nxlog.pid
LogFile	/var/log/nxlog/nxlog.log
LogLevel INFO


define CertDir /etc/nxlog/
Next, there is an input module to define what NXLog is collecting.
<Input in1>
    #To read in a text file output, use this section.
    Module      im_file
    File       "/opt/rapid7/nexpose/nsc/logs/audit*"
    Exec	parse_syslog();
</Input>
The next section is the output module directive, which specifies where and how the collected events should be sent. Be sure to edit this section and enter in the IP address of the InsightIDR Collector that you will send the logs to and the port that you will use.
Download the certificate from InsightIDR and place it in the folder you specified in the global directive section of your nxlog.conf file.
<Output out1>
   Module      om_ssl
   #This is the IP address of the InsightIDR Collector
   Host	       0.0.0.0
   #This is the port configured on the Event Source
   Port        10001
   #specify cert location, the default location is nxlog\cert.
   CAFile      %CertDir%/Rapid7CA.pem
</Output>
The final section provides the route that the data should flow along.
<Route 1>
    Path    in1 => out1
</Route>
A final nxlog.conf can be found at the bottom of the blog.
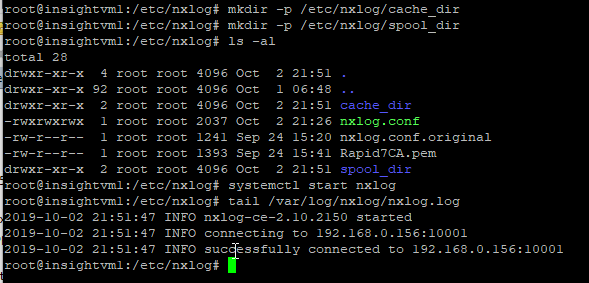
After you have modified and saved the nxlog.conf, copy the Rapid7CA.pem file that you downloaded earlier to the %CertDir% you specified in the nxlog.conf. You also need to create the spool and cache directories:
mkdir -p /etc/nxlog/cache_dir
mkdir -p /etc/nxlog/spool_dir
Next, grant the nxlog user access to the audit.log:
chmod o+r /opt/rapid7/nexpose/nsc/logs/audit.log
After you have configured the nxlog.conf and copied the certificate to its location, start the nxlog service:
systemctl start nxlog
Before continuing, check the NXLog diagnostic log for errors. If you see any, you should correct them before continuing.
Collect some events
Only new entries added to the audit.log will be read by NXLog. It does not attempt to read any existing entries in the file. You should now log into InsightVM and take an action(s) to create an entry in the log.
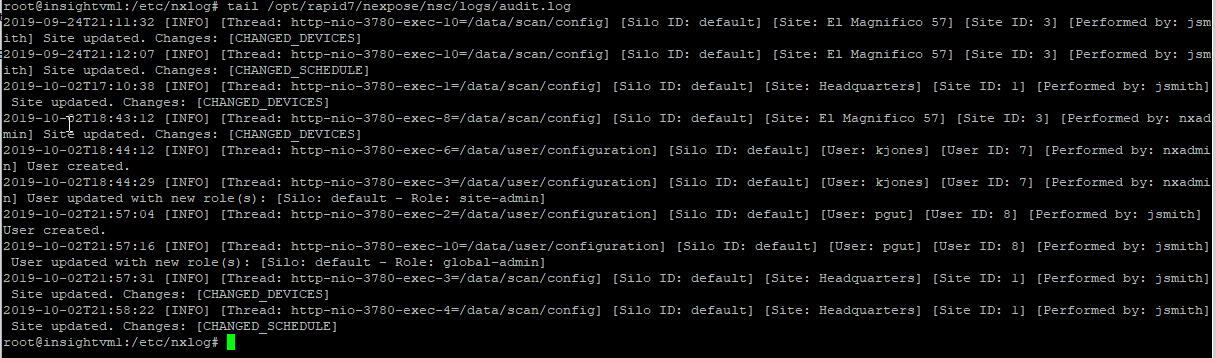
For our test, we created a new user, changed a user role, and edited a site scanning schedule.
Verify that the audit.log has new entries in it.
tail /opt/rapid7/nexpose/nsc/logs/audit.log
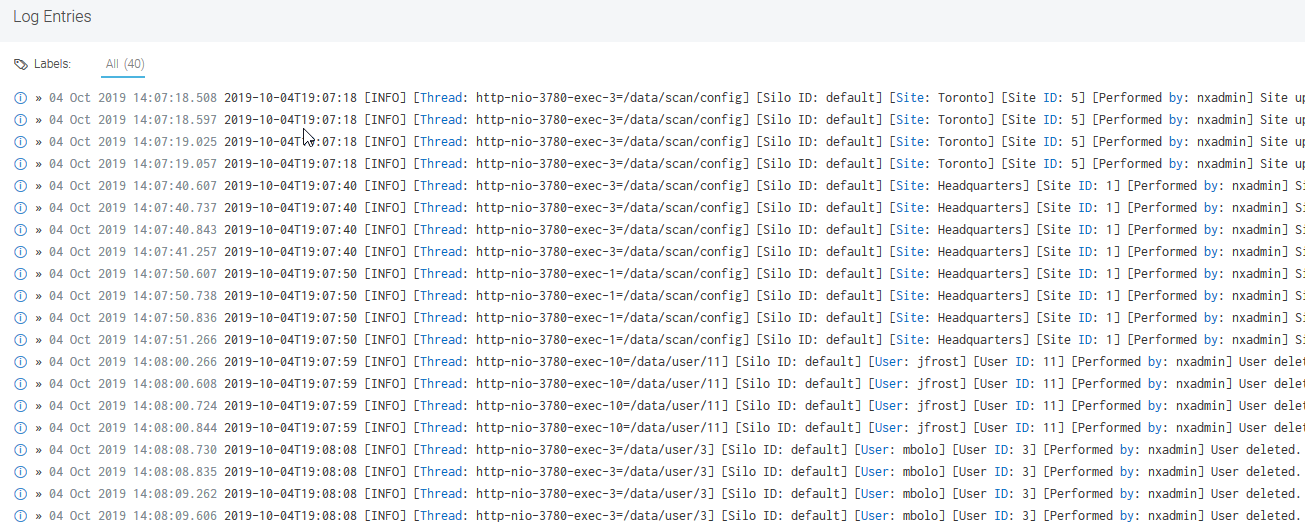
Finally, go over to InsightIDR and make sure that you have logs. You can use the View Raw Logs button on the event source to make sure that the logs arrived at the collector or Log Search to make sure that they are being collected and stored.
Check back soon for our next blog in this series, which will cover parsing out interesting fields.
Not an InsightIDR customer? Start a free trial of InsightIDR today.
Get Started## This is a sample configuration file. See the nxlog reference manual about the
## configuration options. It should be installed locally under
## /usr/share/doc/nxlog-ce/ and is also available online at
## http://nxlog.org/docs
########################################
# Global directives #
########################################
#If nxlog is installed on Linux, uncomment these options.
User nxlog
Group nxlog
# Set the NXLog main directory
define ROOT /etc/nxlog
#Global directives
Moduledir /usr/lib/nxlog/modules
CacheDir %ROOT%/cache_dir
SpoolDIR %ROOT%/spool_dir
Pidfile /tmp/nxlog.pid
LogFile /var/log/nxlog/nxlog.log
LogLevel INFO
define CertDir /etc/nxlog/
#If nxlog is installed on Windows, uncomment these options.
#define ROOT C:\Program Files (x86)\nxlog
#Moduledir %ROOT%\modules
#CacheDir %ROOT%\data
#Pidfile %ROOT%\data\nxlog.pid
#SpoolDir %ROOT%\data
#LogFile %ROOT%\data\nxlog.log
#define CertDir C:\Program Files (x86)\nxlog\cert
########################################
# Modules #
########################################
<Extension _syslog>
Module xm_syslog
</Extension>
<Extension json>
Module xm_json
</Extension>
<Input in1>
    #To read in a text file output, use this section.
    Module      im_file
    File       "/opt/rapid7/nexpose/nsc/logs/audit*"
    Exec	parse_syslog();
</Input>
#Download the certificate from InsightIDR and place it in the folder you specify below.
<Output out1>
Module om_ssl
#This is the IP address of the InsightIDR Collector
Host 192.168.0.156
#This is the port configured on the Event Source
Port 10001
#specify cert location, the default location is nxlog\cert.
CAFile %CertDir%/Rapid7CA.pem
</Output>
########################################
# Routes #
########################################
<Route 1>
    Path    in1 => out1
</Route>
This is part one of our "Be Audit You Can Be” blog series. Continue-on to part two, which covers how to parse out fields in your logs.