
When you start out with one of our vulnerability management solutions, Nexpose or InsightVM, one of the first things you should build and set up is a best practices Scan Template. Because best practices are constantly changing, make sure you look at the date this blog was posted and make your decisions accordingly. Most of the best practices I plan to discuss have been around for several years and have been implemented on many engagements to refine and test them in live environments (though there may be deviations due to different environments).
This blog post will give you a ballpark best practice that applies to the majority of environments, as well as some descriptions that outline the thought process, math, and reasoning.
To get data into the database, we will need to create sites to scan the assets. And, to create the sites, we will need a good scan template. This will be the primary purpose of today’s conversation.
First, you will need to go to the Administration page, then click on Templates > Manage under the Scan options section.
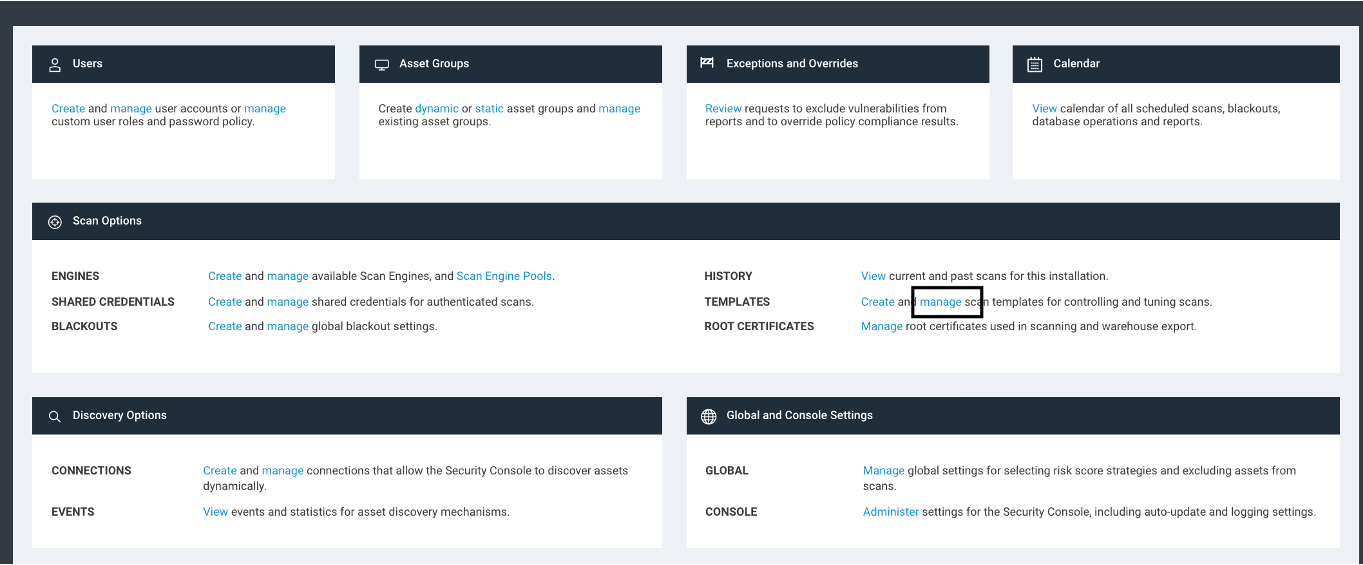
Once you have this page open, you will see a bunch of options available. We are going to use a starting template of the “Full Audit without Web Spider,” so find the copy icon next to that scan template, and click on it.

While you can’t edit a built-in scan template, you can copy it and make all the changes you want to. The “Full Audit without Web Spider” template is the best place to start.
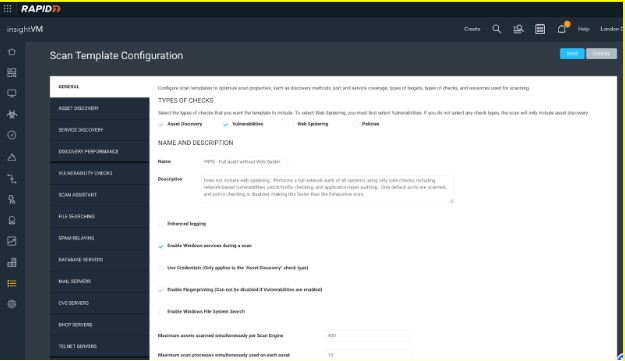
At the top of this template, there are four different “TYPES of CHECKS:”
- Asset Discovery
- Vulnerabilities
- Web Spider
- Policy
Asset Discovery: This option is required for all scan templates, as it is the initial NMAP process we run to both find and guess the OS, as well as find open ports. If Asset Discovery is the only option selected, the scans are 100% free and do not count against your license. This can be combined with the option below, “Use Credentials,” to do Credentialed discovery scans to get strong OS fingerprints with a free discovery scan to get a better understanding of your environment. However, this only applies to the “Asset Discovery” check type.
Vulnerabilities: This option is optional. Combined with Asset Discovery, it will be used in a best practice scan template. Vulnerabilities means we are going to take the fingerprints from Assets, ports and fingerprints found in Asset discovery, apply any applicable creds, or banner grabs and kick off vulnerability checks against those assets. This will cost IP licenses.
Web Spider: Web Spider is essentially obsolete. It is used to spider HTML-based web pages, which are less common on the modern internet. However, I still recommend using this feature when scanning externally, as it can find a backported install of Apache struts. Just make sure to go into the options and set a timeout, as it will get stuck on Dynamic content. If you want a true web spider for today’s internet, you will need to look into InsightAppSec.
Policies: This option is used to scan your assets to see how they stack up against different hardening guidelines, such as CIS hardening guidelines. InsightVM has a fully featured policy scanning ability and is part of the defense-in-depth process of securing your environment. Scanning credentials are required for this feature, and I recommend enabling this feature in a scan template without Vulnerabilities and setting up OS-based scan templates targeting specific operating systems. I generally recommend holding off on Policy scanning until you have your vulnerability management program established and automated, as Policy can be very complex and is hard to justify in the early stages of your deployment.
Based on the above information I generally recommend your first Best Practice scan template to only check the ‘Asset Discovery’ and ‘Vulnerabilities’ check types.
Next is the Name, which will show as “Full audit without Web Spider Copy.” I recommend changing it to “!Full audit without Web Spider.” The exclamation point (!) at the beginning will float the scan template to the top as they are ordered alphabetically. This will help assure it’s the first scan template you see when creating a site.
Next, let’s talk about the options below the scan template name:
Enhanced Logging: Basically, DEBUG logging for scans that should be run before submitting logs to support for a potential false positive issue. Only turn it on when you need it, or it will generate a ton of extra logging.
Enable Windows services during a scan: This option is essentially obsolete. Back before remote registry scans and remote registry patching, there was a policy to block remote registry access. In today’s world, that option should be off on all assets—however, in the off chance it is not off, this option will bypass it and allow a remote registry scan. I recommend enabling it.
General Tab
Use Credentials (Only applies to the “Asset Discovery” check type): This option only works when running a Discovery-only scan with no Vulnerability checks enabled. It allows credentials when running a discovery scan; the assets will still not count toward the license. When enabled, it uses the Maximum assets scanned simultaneously value when authenticating to your assets, and can lead to discovery scan slowdown.
Enable Fingerprinting (Can not be disabled if Vulnerabilities are enabled): This feature is enabled by default in a scan template with Vulnerabilities disabled. However, it can also be disabled to disable fingerprinting with a discovery scan. Since fingerprinting can be a large time sync in the discovery process, this could greatly speed up an asset-only discovery scan. By asset-only, I am implying there will be no attempt to identify the Operating System or other fingerprints, leading to decreased visibility.
Enable Windows File System Search: This feature was built for helping in the detection of Log4J by doing a windows file search. At this point, this feature should no longer be used unless you have a dedicated log4j only scan template. By enabling this feature we will be using the Windows search engine which will greatly increase the impact on the device or asset being scanned. The Rapid7 agent runs Log4J checks as well, making this check deprecated for assets running the agent.
Maximum assets scanned simultaneously per Scan Engine: This is where some math comes in, as it is variable depending on whether you're using the local engine, the OS being used, whether you're using a dedicated scan engine, and the memory and CPU levels. It is arguably the most important option in the scan template, as it controls how fast you can scan, and the default of 10 is very low based on current best practices and needs to be updated.
One of the greatest changes fixed by the Rapid7 developers is around the “simultaneous assets” that were added to the product about a year ago. It basically made it so we now run out of CPU before we run out of memory, which has had a huge impact on customers not running out of memory.
In order for this to work, we need a 1:4 ratio of CPU to Memory. This means we really need to shoot for 4 CPUs to 16 GB, or 8 CPUs to 32 GB’s of memory (2 CPUs to 8 GB also works, but is the minimum requirement, which I generally do not recommend).
Operating systems also have an impact, as Windows-based operating systems tend to use a lot more memory to run windows GUI than the Linux GUI (if headless, there is no GUI). However, I do not recommend you go with Linux just to save on memory. Go with an operating system that best fits into your patch management strategy, as you do not want your server that has all of your network’s vulnerability information on it being the most vulnerable asset in your environment because you can’t patch it. Below is a table of some recommended starting points:
| 8GB/2core | 16GB/4core | 32GB/8core | |
|---|---|---|---|
| Windows Dedicated Scan Engine | 150 | 300 | 700 |
| Windows Console Local Scan Engine | 50 | 150 | 300 |
| Linux Dedicated Scan Engine | 200 | 400 | 800 |
| Linux Console Local Scan Engine | 75 | 200 | 400 |
I have found from working with many customers in many environments that these numbers should work as long as the CPU/Memory is reserved or dedicated to the box. I’ve also found that with these numbers that the average Memory/CPU should be around 60%, so they could be increased further, but do so at your own discretion. I’ve pushed a 32GB/8core dedicated Linux engine to 999 (the field only goes to 999) before and it worked just fine, but I don’t necessarily recommend it.
What do these numbers mean? With an average credentialed scan taking around around 12 minutes, give or take, that means there will be five volleys of assets per hour, and on as 16GB/4core Linux dedicated engine running 400 simultaneous assets per engine, it would mean we would scan approximately 2,000 assets in an hour (with just the one engine). If we add more than one engine, just multiply that number by the number of engines in an engine pool. Scanning can be really fast.
Another factor to take into account is a new option in the “Vulnerability Checks” tab of the scan template called, “Skip checks performed by the Insight Agent.” This option will detect whether an agent is installed and only run the small percentage of checks that the agent cannot do. These scans will run much faster and probably average closer to five minutes per asset, so using the above equation, you could scan even more assets in an hour. For this reason, Agents are highly recommended on as many assets as possible in your environment.
The final option in the scan template is the “Maximum scan processes simultaneously used for each asset” with a default value of 10. I recommend leaving this at 10. This is all about scanning multiple services, and boxes should not have more than 10 open services. If they do, you should seriously look at why they have so many open services, as each service is a potential access vector for a vulnerability. In the end, it used to be 1, and 10 is 10 times better than it used to be. I generally do not recommend going bigger.
There will be some differences, as a lot of the numbers in this guide are based on best practices from five years ago, and are not the best practices of today. This is another reason why I recommended checking the date this was written. Things are constantly getting better and improving!
Asset Discovery
Next we will talk about the ‘Asset Discovery’ tab on the left of the scan template options. I like to call this the dead asset mitigation tab, as its primary purpose is to root out all of the dead assets so we can focus on alive assets.

The first section, “Verify Live Assets,” includes the steps we take to determine whether an asset is alive. First, we try an ICMP Ping. If we get a response on a given asset, we’re done and don’t need to take any additional steps—fast and easy! However, if we don’t get an ICMP reply, we then try ARP. If the scan engine is in the local network segment, this might work and we might get a reply, and if we don’t, then we move on to TCP, and finally UDP.
If we get to TCP, we will send a SYN to the listed ports. We are hoping for an ACK reply, but a response isn’t a response, isn’t a response. Some TCP responses can be a bad thing, such as a TCP Reset response. TCP reset responses are generally sent by an IDS in an attempt to shroud the asset by responding with TCP resets for assets that don’t exist. This can cause a massive number of “ghost assets” or assets that show up as alive with no hostname or operating system, meaning thousands if not tens of thousands of assets show up that do not exist. To help with TCP resets, make sure to check the box for “Do not treat TCP reset responses as live assets.” I find this option to be almost required in most environments, as firewalls that you may scan across have some type of built-in IDS functionality that may cause this.
Last comes UDP—though it’s unlikely a box will be alive that doesn’t respond to ICMP, ARP, or TCP but is somehow found using UDP. When scanning large network ranges like class As or Bs, unchecking this option is just one less thing to try on every dead asset and would allow the scan to get through all of those dead assets much faster. It’s up to you whether you want to disable this, though I generally recommend it.
The next section, “Collect More Asset Info,” I would recommend leaving all default. “Find Other Assets on the Network” and “Collect WHOIS Information” do work, but it does not integrate that information into the database. So, get on your log spelunking hat, because that’s the only way to see those results. For this reason, I do not recommend turning those on.
Never turn off “Fingerprint TCP/IP Stacks,” as that is going to give you that OS guess that is better than nothing when not using scanning credentials. Also, the retries setting defines how many times InsightVM will repeat the attempt to fingerprint the IP stack, and unless you're in a very latent environment, I recommend leaving it at zero.
Finally, address the minimum certainty. This option will dump results under whatever is set as the minimum. Years ago, we used to recommend making this number a little bigger (like .65) but now I generally recommend default, as I would rather take something than nothing. Here are some basic fingerprints you might see:
- Anything below .70 or 70% is an IP stack analysis guess. We look at the ACK and NMAP makes a guess. In general, .60 to .70 tend to be more accurate guesses, and anything below are low-certainty guesses, but it’s better than nothing, in my opinion.
- .80 or 80% generally means we found a banner, usually an HTTP banner.
- .85 or 85% usually means credentials were successful, but they only achieved GUEST access and could not access the registry and could not get a software inventory.
- .90 or 90% generally means an SNMP banner.
- 1.0 or 100% means credentials worked, and you should be getting the exact OS of the asset, which generally equates to the best possible scan results.
The last section, “Report Unauthorized MAC Addresses” is explained in the template, and I don’t recommend using it unless you really need to.
Service Discovery
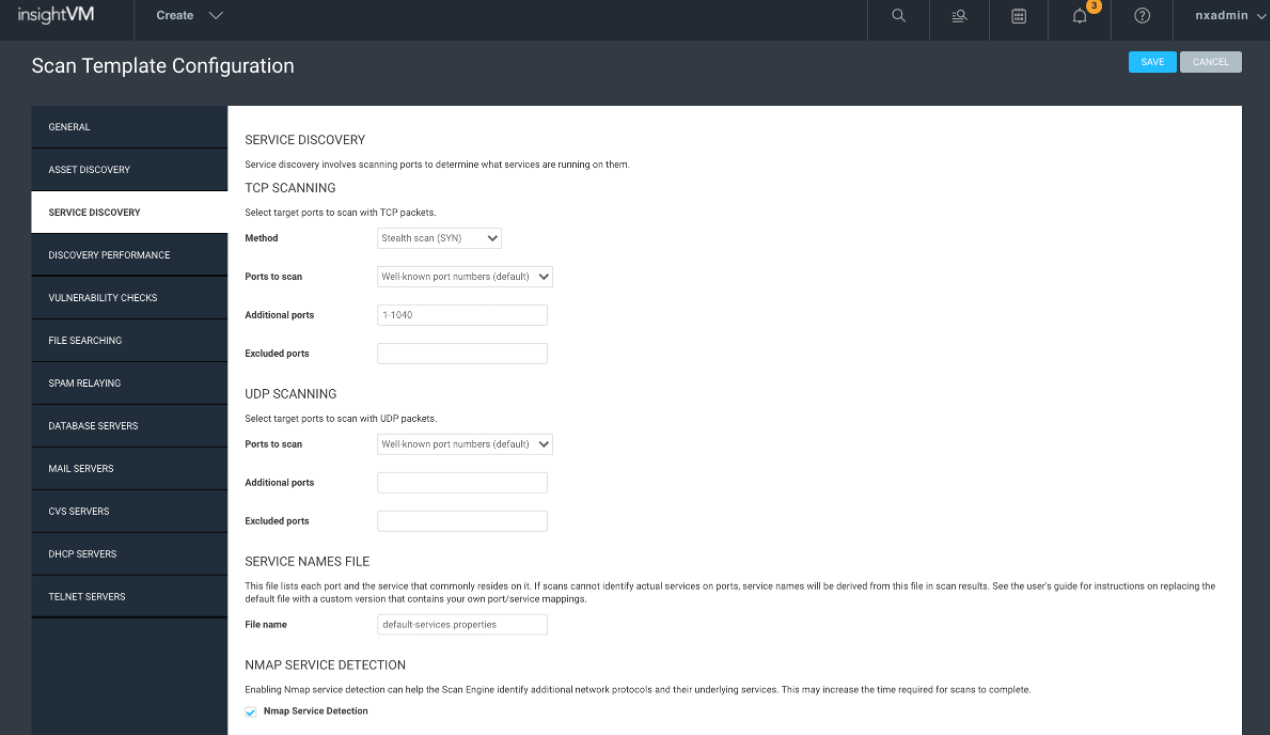
I recommend leaving everything default in this section, especially when doing unauthenticated scans where the goal is to get an overall view of the network. The service discovery could also be called port discovery, and by default, we use SYN>ACK, which is very solid, stealthy and lightweight. The “Well Known Port Numbers” also tend to be good enough. For authenticated scans, where you just want to run patch checks, you can get much better performance by limiting to the ports known to be used with any credentials provided in the site configuration.
The only time I might recommend doing all 65K is when scanning your external attack surface assets. Never run all 65K UDP unless you want to wait a couple months for the scan results. If you are curious to see what the well-known ports list looks like, you can find the full NMAP command at the beginning of any scan log roughly a couple hundred lines down.
Another workflow that might not be a bad idea is to do a quarterly or yearly all 65K TCP scan just to get the delta on any ports that we are not finding with the “Well Known” ports, then add them to the additional port list. As for excluded ports, I’ve seen a lot of customers exclude the 9100-port range, as it can impact certain printers.
The Service Name file is another option with a description and use at your discretion, and I generally recommend just leaving it alone.
The last option, “Nmap Services Detection,” is a new option that adds roughly 88,700 additional NMAP fingerprints, at the cost of the scan taking five to 10 times longer. I only recommend enabling this option for sites that you do not have good credentials for. We can also account for some of the scan time increase by increasing the parallelism setting in the next tab, “Discovery Performance,” at the cost of increased bandwidth used by the scan. I have found that 500 almost completely mitigates the scan time impact.
These are all basic core NMAP options recast into tuning options on this page. For detailed explanations, you can visit this site to find in-depth reviews of each option—you just have to figure out which option is which.
First, we will discuss the scan resiliency features at the top of the page:
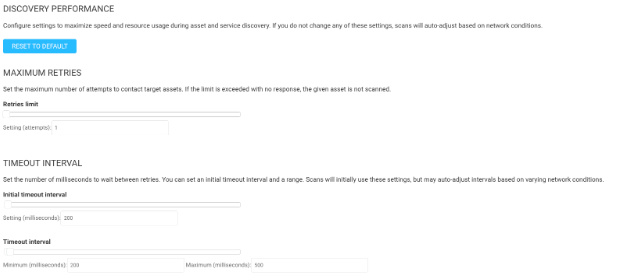
Of the above options, it is all about scan resilience. Resilience to timeouts and resilience to network latency. The default settings are set to be extremely resilient. Retries set to 3 indicate you are scanning a network that is prone to lots of timeouts, so we try to contact an asset 4 times (1 initial packet and 3 retry attempts) to ensure we are able to get accurate results. However, we are also retrying three times for every dead port we are scanning, which will significantly increase the scan time retying over and over. If you know that the network you are scanning is relatively timeout-free, which most are these days, I recommend lowering that setting to 1.
Next, regarding the Timeout Interval settings, these are more related to network latency. Again, most networks today are extremely robust, and ping times are usually in the low teens and maybe spike to a hundred from time to time, but never over 200. Unless you’re using an engine to scan devices across the world or via high-latency satellite connections, my recommendation is to lower the minimums from 500 to 200 and the maximums from 3000 to 500.
The default settings would implement an initial timeout of half a second, and then 3 seconds for each of the three retry attempts. That’s a total of 9.5 seconds per dead port, and if we are scanning roughly 1200 total ports on each live asset (as is the case with our Full Audit without Web Spider template), that adds up to a LOT of time waiting for responses. But if the above changes are made, the total wait time is reduced to 0.7 seconds. That’s roughly a 14X decrease in wait time! Now you see why these settings can be so powerful, as long as latency is not generally an issue in your environment.
Next, we will discuss the three below options for scan speed by using network bandwidth:

By default, Scan Delay is 0 and Parallelism is 0. They are both dynamically set by the minimum packets per section rate (min-rate). Basically, the Scan Delay is how long we wait between sending volleys of SYNs to ports, and the parallelism is the size of the volley.
The minimum packets per second section is the primary way to make the Discovery part of the scan run fast, at the cost of bandwidth. With TCP being designed in the 1970s back when networks were extremely small, it was designed to always slow down rates to the minimum, so increasing the minimum will force the network to use more bandwidth and run the scan faster. The default of 450 packets per second, with an average packet size of 1,500, means you are using around 600kB/s of bandwidth for your scan. This is not an issue unless you are running on an old ISDN or DSL WAN connection. Most WAN links today are usually 100MB/s plus, so this number can be gradually increased to speed up the scan. I generally recommend trying 2,000, and work with your network team to ensure they don’t notice any impact and maybe go a little bigger.
On a 100 MB/s connection a couple MB of bandwidth is usually inconsequential and can greatly speed up asset discovery. For example, a Class A, over 16 million IP’s at 450 usually take a little over 3 days to scan, and with the PPS set to 2000 it will take less than a day.
Note: These PPS settings are per engine, so if you set it to 2000, which means ~2.5 MB/s, if you have a pool of 4 engines, that might use closer to 10 MBs of bandwidth.
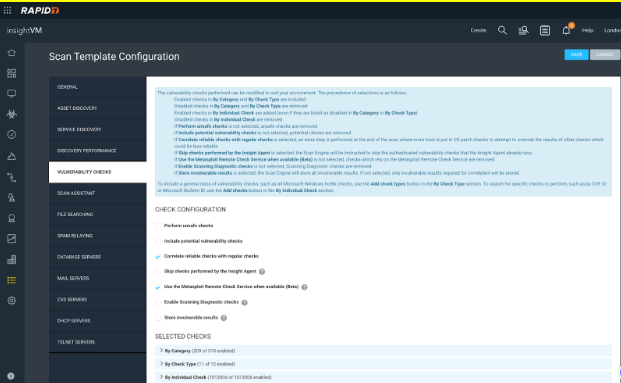
There are seven options that we can turn on or off at the top of this section and I’ll outline those below:
Perform unsafe checks: This is a remnant of the past where the PCI board required basic DoS and Buffer overflow testing for PCI ASV. The PCI board no longer requires this, and these checks are no longer used, but are still in the console. Note that most of these checks are extremely old and could still cause damage, so I recommend not checking this box.
Include potential vulnerability checks: It is not always possible for unauthenticated vulnerability checks to be perfectly reliable. When a higher number of false positives are acceptable, in order to minimize missed vulnerabilities, “potential” checks can be enabled. This is not recommended for default scans due to the lower signal-to-noise ratio.
Correlate reliable checks with regular checks: This option I have still seen used and can be of great help. It basically only applies to RHEL or CentOS operating systems running either PHP or Apache. Let’s use RHEL running Apache, for example. System Administrators like to run Apache on RHEL because when you update RHEL, it automatically updates Apache, which is nice. The challenge is, RHEL does not update the Apache banner when it updates Apache, so if you’re not using credentials and we can’t get a ‘Reliable’ check on your OS, we have no choice but to use the ‘Regular’ banner grab and depending on how many years old it is, it may mean thousands of false positives. This could still happen even with Credentials if this option is unchecked, so always make sure this option is checked so it will correlate the reliable credentialed OS grab with the regular banner grab to remove any vulns detected from the banner information.
Skip checks performed by the Insight Agent: We discussed this above and it's pretty self-explanatory. If we detect that the asset has an agent, we only run the network based checks that the agent cannot, which will both speed up the scan and also increase the accuracy by not trying to correlate scan results with agent results. However, there is a caveat for using this feature. If for example you are running an AD-HOC scan, it will also skip any checks performed by an agent, and since the majority of checks are found using the agent there is a good chance that ad-hoc scan will not produce the results you are looking for. If you are going to enable this feature, I recommend it be only enabled for scan templates used in your scheduled scans, and keep this disabled on the primary scan template assigned to the site to prevent challenges with ad-hoc scanning.
This feature can also impact the ability to use the ‘Vuln Validation’ feature in Remediation Projects, as that feature needs to know which engine found the vulnerability so that a quick scan against it can be done. If the checks performed by the agent are skipped in all scanning, then there will never be a record in the database of which engine can get to that asset and that vulnerability. It’s common that when customers try to use the vuln validation feature, if it fails, this is one of the reasons why.
Use Metasploit Remote Check Service when available (Beta): If your Scan Engine is Linux-based and has the Metasploit Remote Check Service enabled already, enabling this option instructs the Scan Engine to run “Metasploit” vulnerability checks provided by that service. If not enabled on the scan engine, it will give an error message in the scan logs, but otherwise does not affect your scanning. Learn more
Note: if this is enabled it does use extra memory which may affect the number of assets scanned simultaneously configured on the General Tab. I recommend reducing the number slightly (by 25 on Linux) to accommodate the 1 GB of RAM this feature requires.
Enable Scanning Diagnostic checks: The scan diagnostic checks report on scan details (e.g., Credential Success) but do not report on vulnerabilities. If you are having trouble with credential success and need a better understanding of why credentials are failing, I recommend enabling this setting.
Note: This credential diagnostics present as vulnerabilities, so if the credentials do fail expect to see an additional vulnerability on that asset.
Store invulnerable results: Enables the storage of invulnerable results. When scanning a device, all vulnerabilities, whether successful or not, will be sent back to the security console in the scan logs. This is required for some PCI auditors. When disabled, only the vulnerabilities that were found to be successful on the host will be sent back to the console. Disabling will reduce disk space usage for scan data and speed up your scans, but prohibit reporting on invulnerable data. However, invulnerable data required for correlation will still be collected if vulnerability correlation is enabled. Unless your PCI auditor explicitly requires a list of all vulnerabilities attempted on a target device, it is recommended to leave this setting disabled.
Note: False negatives are extremely rare, and that is the primary need for invulnerable data. The only way to troubleshoot a false negative is to determine if the check even fired. However, due to the extreme rarity of false negatives, I highly recommend keeping this option disabled unless you have a specific need for it in an ad-hoc scan.
Last, in the ‘Selected Checks’ you can see all of the vulnerability categories which can be used for other parts of the tool, or search for checks using the ‘By individual check’ drop-down. None of these options should ever be touched.
Of the remaining sections:
- File Searching is a thing, and I don’t recommend using it.
- Spam relaying is essentially obsolete with Web Spider.
- Database servers can be used if you plan to do policy scanning config checks against non-windows databases so you can add the database names.
- Mail Servers, CVS servers and DHCP servers just leave default.
- Telnet Servers is used if you get Telnet false positives so you can add custom Telnet failed login responses to the regex if you run into those default account challenges.
Now you should have a great starting Scan Template for your InsightVM scanning deployment. Just hit save and now it will be the first result when creating a site to start bringing data into your database!
NOTE: Most of the recommendations above are different ways to min/max the Rapid7 scan templates and are intended for scanning systems that were built post the year 2000. If assets in your environment were built before the year 2000, or if you have old networking gear that can’t keep up with modern vulnerability scanning speeds, it's crucial to exercise caution. I recommend keeping the defaults and or tuning down the scan template for those devices as most would call them antiques at this point. You are very likely to encounter stability issues when applying the changes that speed up scanning.